I started this project off much like I had Tobi's mask - with Crayola Model Magic.
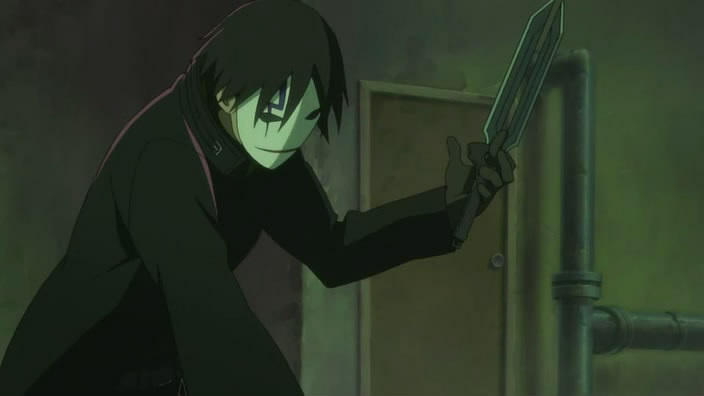
Unfortunately, I rapidly discovered two things about this mask. One is that this was going to need to be much thinner than I first expected, and second was that the eyes of the mask, in a screen shot of the anime, are further apart than actual human eyes. I needed to remedy both of these problems.
So my first step was to work out a new design for the mask. I began by making a basic shape on paper of what I thought the mask looked like. In some images of the mask, the chin is more rounded and in others, it is quite pointy. The rounded but slightly pointy chin was a mix of the two. I also discovered a new material to work with at this point while searching for a material that would be a cheaper substitute than wonderflex. It is called Sintra, which is used in sign making, and is heat moldable. Unlike wonderflex, it is smooth on both sides, comes in many different thicknesses, but does not stick to itself. It is also quite cheap (a 4'x8' sheet was 40 dollars from a local place) so I was pleased to give it a shot.
Here you can see three variants on the mask in one shot. The farthest right is the paper mask I worked out with eyeholes. The one on the far left is the previous attempt with model magic, and the one in the middle is my first experiment with the Sintra. I discovered that using a heat gun, as I did with wonderflex in the past, worked but it could 1) burn the Sintra leaving scorch marks and 2) did not heat it evenly enough to get a smooth flow.
This was my first real attempt of the mask. I discovered that by putting the Sintra in the oven at 200 degrees, it turned as flexible as paper. I only had to gently hold it in the position I want for about a minute in my hands, and it stayed perfectly in that shape. I also quickly drilled the eyeholes so I could start to see what I was doing.
It was about this point, as I sketched on the eyes, that I realized I needed the mask to be flat to cut out the eyeholes instead of curved. I also realized the mask was too long and would not fit properly under a wig. So I made a second mask and this first mask became a 'test mask' so to speak.
Here is another set of multiple stages. The top-far-right is the test mask, and the center-top was the newly cut and curved mask.
You can see from this incredibly silly picture how I look through the corner of the eyes more than the center - this gives the appearance of the eyes being further apart than they really are. For any question of it - I could see perfectly through the holes with only a very faint mark directly in the center that didn't bother me at all. It also shows how the mask fits easily enough under a wig to give the right illusion it requires.
The eye holes were 'hidden' in the screen shots, so I improvised. From a left over pair of pantyhose from my Deadmau5 head, I used a sharpie to color them black and hot glued pieces of it stretched over the eyeholes. The pantyhose all but melted into the hot glue, which I quickly realized was a requirement to keep the hose from running. The illusion worked very well in a quick test with a camera and flash. I could see well enough through the eyeholes to not be concerned and they could not see my eyes.
I used black paint around the edges of the eyes to help further the illusion of the hidden eyes, and covered the mask in white gesso. The Sintra is easily damaged by nearly anything, and this hid any marks from sanding. It looks perfect in pictures, so I was pleased.
I cut templates for the lightning bolt over the eye as well as the mouth. Again, some compromise had to be made with the mouth. In some images it is 'smiling' and in some it is 'flat'. We went with this. The over all mask highly pleases me. The simple solution of the eyeholes turned out to be a very positive one, and the material choice has led me to believe I will be making all further masks with Sintra. I still have mounds of it left over, eep!
View the creation of cosplay props in progress and learn some interesting techniques to help with your own.
Showing posts with label hei. Show all posts
Sunday, May 15, 2011
Tuesday, January 18, 2011
Hei's Daggers - Darker Than Black: Part 4
You might wonder how these daggers turned out. Unfortunately, the person who commissioned me never paid their final payment, and thus I ended up sitting around waiting to see how it would resolve before I did my final post on them. I never did end up getting paid, so these daggers are going up for sale.
This is the dagger from the previous mold out of the sander. With my client wanting the blades as thin as they were, I was coming up against a few major problems. Mostly, my cast was not perfect mirror image of itself, and I was having to handle that. I continued sanding it down, and gave them a fast coat of some boring black matte paint just so I could see the imperfections of the blades.
Clearly not perfected yet, but I showed them to the client. He was unhappy with them, so I offered to recast them and give it another shot. I also wanted to try a different method of putting the blades together, hoping for a smoother make.
You can see here the top blade is put together using a very strong adhesive, and sanded, while the bottom is the same adhesive, not sanded. So, after more sanding, I was finally happy enough with them to give them their first spray coat.
Problem: the spray coat bubbled. Oi, seriously? So, while the daggers looked better, I had to strip off most of the coat and go at it again.
The stripped coating and reapply turned out better. I started to edge them in silver.
Here are the basic final daggers. They're sitting sullenly waiting for an owner now, due to my commisioner not paying for the final payment. They've been sitting for about four months now, so I plan to touch them up. You can see how thin the blades turned out in the end, but I think that was part of what made this all so difficult to do. With a thicker blade, a little less accurate, I think it would have been easier to work with. In fact, I actually made FIVE daggers. One broke because the blade was so thin. You can see the difference between the final pair (on top) and the first pair (bottom). Final pair has the proper paint and final sanding while the bottom pair does not.
As always, I put my thoughts on the pieces. Well, first thought, is I would not do these out of resin if I did them again. I would do them out of wood like I had originally desired to. It was an interesting experience to go down though. Resin molding definitely has its advantages, but I think in other circumstances than what I tried to do with it. I think the biggest problem was the thinness of the blades the client wanted. It made for quite a few difficulities. I also think I would go at it more with a detail sander than the belt sander. All in all, the daggers look good in photographs, they have an excellent weight, and myself and everyone who's come into contact with them loves posing and playing around with them.
If you wish to purchase them, please email me at the email above and we'll come to a price. I'm willing to go fairly good on the price as these aren't made to anyone's specific needs and I'm only trying to get back what was lost due to lack of payment from the client. I'd also be willing to sell the first pair, but I would need to finish them off (final sanding and painting). They are a little thicker, a little heavier, and a little more sturdy than the final pair.
Labels:
daggers,
darker than black,
fiberglass,
hei,
molding,
resin
Tuesday, August 17, 2010
Hei's Daggers - Darker Than Black: Part 3
After all of those painful setbacks with the daggers, I was actually going into this part with a heavy and concerned heart. After using a product with the Smooth-On company before, I decided to give them a call and see what they suggested. They suggested their OOMOO 25 product, and so would I.
It's a really, really simple mixture. Take container A, add matching amount from container B, pour into mold. I built a mold out of some cheap thin wood I had lying around and hot glue, proving you can make a basic mold from anything. I put my dagger I built from the foam board/clay and poured this mixture over it. Low and behold, I ended up with the mold above.
Tis floppy, no? It picks up every little detail and texture, even the wood it was poured into! Its durable stuff.
Now, the problem came that their casting resin? Is 150 dollars a gallon. Mind you, I didn't charge my client nearly enough money to buy their resin. So, it got me thinking. I spent my lunch break hunting down some more fiberglass resin since Lowes decided to stop carrying it, and I lugged home a gallon of it for 35 bucks. Mind you, I didn't have any sort of releasing agent or anything for this. Now, after the problem with 'resin dissolves foam', I decided to do a wee test batch. I took a piece of the mold and cut it off, cut that piece in two, then submerged half of one piece into a cap full of resin and slathered a bunch of resin on the other piece.
Much to my joy, the resin didn't eat the mold material at all! Even MORE of a surprise, when I gave a light tug on the piece I had half-submerged? It slipped right out! No damage to mold or resin.... PERFECT.
So, I mixed up a match of resin, realized quickly after pouring it I made way too much, and hoped.
Very quick note: I discovered that for some reason or another, the resin will stay where you pour it. Meaning if you pour it thick in the tips, instead of evening out like, say, water... it'll stay real thick at the tips. Oh well, lesson learned... the instructions for fiberglass resin says to add 'a few drops' to it - screw that. I always had 'a hefty squirt' to it. It dries faster and, if you screwed up and didn't add enough hardener, you won't accidently have half-dry-but-unable-to-finish-drying resin like I had once. >.>
One hour later...
I had this beauty. It slipped RIGHT out of the mold without any problems or damage to mold or dagger. It is PERFECT. It took to every detail like a charm. The dagger is going to need some facetime with Mr. Belt Sander and Mr. Dremel though, but I call it a huge success.
How thick it ended up being - thicker than required but that's what a belt sander is for.
Detail shots. You can see how the angles turned out beautifully.
I actually poured a second one right after this. I will have to play with the pouring to get an even thickness, but produce four or forty of these will be no problem. I need to do two more tonight, hit the under sides with the belt sander to get an even thickness, glue them together, then belt sander+dremel v. 2.0 to get the daggers even and flat all around. Then its gesso, painting, aging, and... SHIPPING! On schedule for Sept. 1st delivery date.
Labels:
daggers,
darker than black,
fiberglass,
hei,
molding,
resin
Monday, August 2, 2010
Hei's Daggers - Darker Than Black: Part 2
It probably seems like I forgot about this prop, but I haven't. Actually, it turned into a complete nightmare. First, if you remember, I laid out the pattern on cardboard. Then, I cut it out.
Either I need a new knife or this particular cardboard was crap - it was so hard to cut evenly. But, it gave me and my client a perspective on the 3D design of it.
After some consultation on the length and width and such, we cropped it down to this.
So my original plan was to make it out of foam, sand it, then put a layer of clear resin over the foam to be able to make it into a mold for, well, molding.
While this started out as a success, and I was very pleased with my brand new jigsaw, there quickly became a problem I had never had before making props - it snapped, clean in half. I think I stared for a solid minute at the broken blade before I sighed and realized this wasn't going to work. Due to the double-bladed design of the daggers, I couldn't get in along the edges properly without the foam snapping. So, I ended up trying something new.
Don't laugh! I used this when I was in college. It's called foam board - two layers of thick paper with foam between them. First was the trick of finding this stuff in a new location since I didn't have a huge art supplies store (actually I had two) in Philly. Once I found it - surprisingly on sale which got me a lot for five bucks - I laid out my design on it. Now, building that cardboard cut out before? Came into amazing amounts of help. The foamboard version turned out nicer and was easier to cut.
Now there's a trick to it. To use foamboard like this, I had to layer it. You can see it in the picture above. The other problem was that this has very slight angles on the edges for the blade, which is quite thin, so I couldn't build on it. After some pondering, I carefully cut 1/8th of an inch from the edge into the paper and removed the first layer, then sanded the foam beneath to give me a sloped edge!
Now, all of this was very rough, not smooth, and clearly doesn't have the beveled edges the dagger should. So, that process began with an old friend of mine - Sculpy Clay!
Here's the final. I used my heat gun I have for paint stripping+wonderflex melting and baked the clay right onto the dagger as I was going. It's a nice, smooth look - not perfect, but I'll have to do some sanding on the resin when its molded. This is one half of the dagger - they're symmeterical, so I'll make four copies and glue two halves together. I am pleased how this is coming out after some serious agony about what was going on with it. I give a huge thank you to J-F, who is another builder and my good friend, who gave me some encouragement to keep going after the foam-snapping incident. (And after the clay-gourd 'frankengourd' incident, too.)
Labels:
daggers,
darker than black,
hei,
molding,
resin
Thursday, May 27, 2010
Hei's Daggers - Darker Than Black: Part 1
Using two (1, 2) reference pictures I discovered, I came across the achingly familiar problem with cosplay prop design: no two stills are ever alike. The proportions change, the shape changes, the design changes, the color changes, everything changes depending on the creator's flight of fancy and level of detail needed for the scene. So as usual, it came down to eyeballing things. In this case, I realized that the daggers must be slightly longer than the character's arm from inner elbow to his fingertips. Having gotten that length from my client's arm, I had something to work with.
The basic proportions, have some almost painful work, ended up being roughly that the blade was 3/4 again as long as the hilt+guard. So Hilt+Guard = 7.5in, Blade = 12.5 for a 20 inch dagger. The proportions were not fun to do and took me a few hours to manage. Oh who am I kidding, I love figuring out the math. What I do not like doing is trying to measure things from an image on my screen. I also went about measuring the broadsword I have in my closet to find out the width of a comfortable hilt as well as the proportion of the blade to the hilt. You can tell from the pictures that the hilt is thinner than the blades, but thicker than the gap between them, and the guard is wider than the blades. I am pleased with the way the design ended up coming out.
Next up is cutting out the design from the cardboard (got client approval for the design late last night) and tracing it out onto foam. Then begins the part of prop design that always ends with aching hands and sore wrists... cutting and sanding.
Subscribe to:
Posts (Atom)